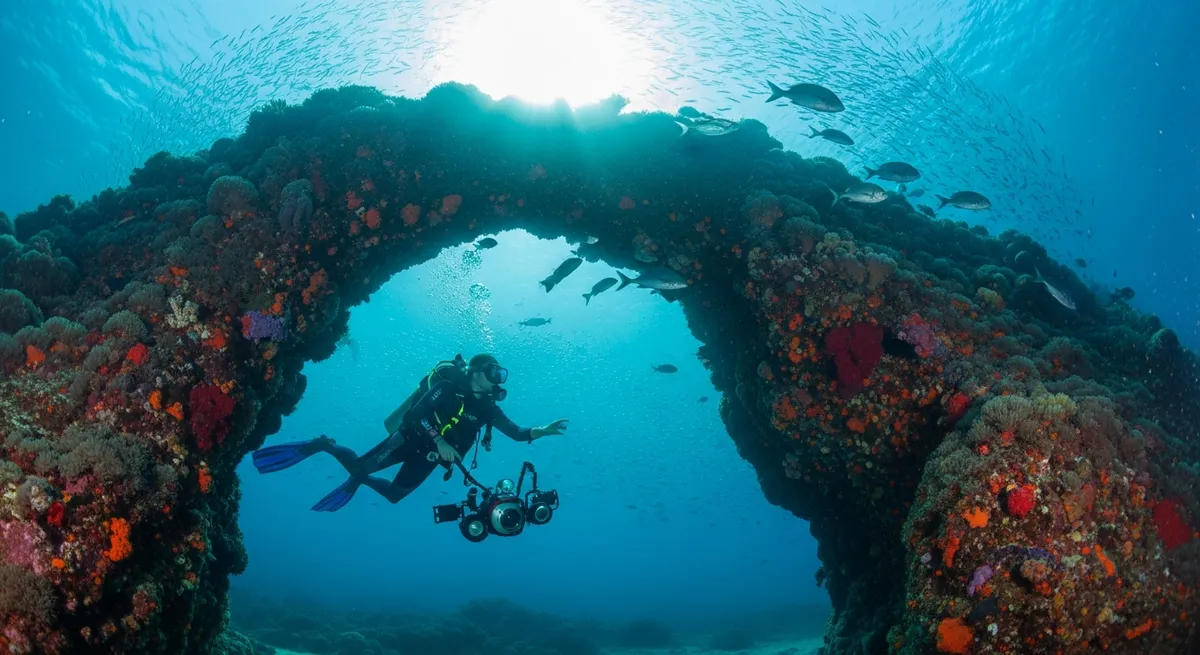
Diving in Poor Knights Islands
Why dive here
Poor Knights Islands offers some of New Zealand's richest diving, with 79+ marine species recorded in the area - including blue sharks, dolphins, hammerhead sharks, humpback whales and orcas. Water ranges 16-22°C, warmest January, February, March.
The Poor Knights. We’ve been lucky enough to dive a lot of places, and these islands near Tutukaka really do stand out. It’s not just the dramatic cliffs plunging into the Tasman, or the kelp forests swaying in the surge, it’s the sheer density of it all. You drop into the water and immediately you’re surrounded by schooling blue mao mao and trevally, so thick sometimes you feel like you’re swimming through liquid silver. Our favourite spots are always around the archways and caves. Northern Arch, for example, feels less like a dive site and more like an underwater cathedral, with light shafts piercing through the gloom. It’s a completely different vibe inside than out on the pinnacles, where you might get a quick glance at a bronze whaler cruising by, or a playful seal darting through the kelp. Keep an eye out for nudibranchs tucked away on the walls, and the occasional lemon sole camouflaged on the sandy patches. Water temperatures are best in late summer, January to March, when it’s a bit warmer and visibility often stretches to 20-25 metres. We’d suggest going with a local operator who knows the currents, as they can pick up, particularly around the outer pinnacles. There are 88 named sites, but even on a busy day, you can still find a spot that feels like your own private marine reserve.
Poor Knights Islands Dive Site Map
Dive sites and dive centres in Poor Knights Islands
Poor Knights Islands Dive Sites
97 dive sites in Poor Knights Islands
ABC Bay
ABC Bay, despite its relatively shallow maximum depth of 7m, is one of our favourite spots at Poor Knights. You’re not here for dramatic drop-offs, but for the sheer density of life tucked into every crevice of the kelp-draped rock wall. We particularly love poking around the darker spots, often finding a Spitlure Frogfish camouflaged perfectly, or coming face to face with a grumpy-looking Crested Blenny. The visibility averages 8m, which isn't gin-clear but honestly, it’s perfect for the intimate scale of this dive. The sandy patches are great for spotting Smooth Skates, and sometimes you'll even catch Pacific sardines shimmering past in thick schools. It's a fantastic site for macro enthusiasts and anyone who enjoys a slow, deliberate exploration. If you visit in winter, keep an eye out for playful seals zipping through the kelp. This site is ideal for photographers and divers who appreciate the smaller, often overlooked inhabitants of the reef.
ABC Bay
ABC Bay, despite its relatively shallow maximum depth of 7m, is one of our favourite spots at Poor Knights. You’re not here for dramatic drop-offs, but for the sheer density of life tucked into every crevice of the kelp-draped rock wall. We particularly love poking around the darker spots, often finding a Spitlure Frogfish camouflaged perfectly, or coming face to face with a grumpy-looking Crested Blenny. The visibility averages 8m, which isn't gin-clear but honestly, it’s perfect for the intimate scale of this dive. The sandy patches are great for spotting Smooth Skates, and sometimes you'll even catch Pacific sardines shimmering past in thick schools. It's a fantastic site for macro enthusiasts and anyone who enjoys a slow, deliberate exploration. If you visit in winter, keep an eye out for playful seals zipping through the kelp. This site is ideal for photographers and divers who appreciate the smaller, often overlooked inhabitants of the reef.
Alice A. Leigh /Rewa ShipWreck
The Alice A. Leigh, often called the Rewa, is a charming, shallow wreck off Moturekareka Island. We love it for how accessible it is, perfect for knocking out a couple of dives without a deep deco penalty. The main hull sits at about six meters, easily visible from the surface. It's really just the ribs and parts of the mast now, but enough structure remains to explore a little. You can weave through the broken timbers, watching for the mottled triplefins that zip between the rusty plates. Snapper often hang around the larger sections, and the occasional smooth skate glides past. Visibility averages seven metres, which is decent for a bay site. It’s pretty sheltered from strong currents, making it a relaxed dive, especially good for newer divers or for photographers wanting to take their time.
Alice A. Leigh /Rewa ShipWreck
The Alice A. Leigh, often called the Rewa, is a charming, shallow wreck off Moturekareka Island. We love it for how accessible it is, perfect for knocking out a couple of dives without a deep deco penalty. The main hull sits at about six meters, easily visible from the surface. It's really just the ribs and parts of the mast now, but enough structure remains to explore a little. You can weave through the broken timbers, watching for the mottled triplefins that zip between the rusty plates. Snapper often hang around the larger sections, and the occasional smooth skate glides past. Visibility averages seven metres, which is decent for a bay site. It’s pretty sheltered from strong currents, making it a relaxed dive, especially good for newer divers or for photographers wanting to take their time.
Ann's Rock / Astrid's Wall
Ann's Rock and Astrid's Wall is one of those sites that just feels right, a classic Poor Knights drift that can really deliver. We usually drop on the outside of Ann's Rock, letting the current carry us along the vibrant wall itself. The sheer density of schooling fish here is what we love – think thousands of demoiselles and swarms of snapper, often so thick you have to fin through them. Keep an eye out for the big pelagics too. We’ve seen striped marlin cruise by in the blue, and bronze whalers are a fairly regular sight. The wall itself is a tapestry of colourful sponges and anemones, with plenty of nooks and crannies to peer into for green wrasse and the occasional crayfish. Our favourite part has to be the feeling of that gentle push of current, gliding effortlessly past the scenery, with the knowledge that anything could swim out of the blue. This site is perfect for divers who appreciate a good drift and want to experience the sheer abundance of Poor Knights marine life.
Barren Arch
Barren Arch is a firm favourite with our team. We think it’s one of the best ways to experience the Poor Knights, a real journey into the islands' character. You enter through a narrow cut on the seaward side, the kelp-covered boulders at the entrance giving way to deeper water. Drop down to around 15 metres, and the light shifts dramatically. It’s here you’ll find walls absolutely plastered with sponges, bryozoans, and hydroids, a riot of texture and muted colour. Keep an eye out for the endemic Jason Mirabilis nudibranch, often tucked away in these crevices – we’ve had some cracking finds there. The real draw, though, is the sheer volume of fish. Schools of blue maomao and pink maomao create these living curtains of colour, often mixed with demoiselles and koheru. If you’re lucky, you might spot a bronze whaler cruising past the entrance, or a black stingray resting on the sandy bottom inside the arch. We like to drift through slowly, taking it all in, especially on a sunny afternoon when the light filters in. It’s a site that suits divers comfortable with a bit of a current and ready for a proper exploration.
Bartle Bay
Bartle Bay isn't always the easiest dive at the Poor Knights, and that's precisely why we love it. Tucked into the channel between the two main islands, it catches a lot of surge, which means you need to pick your day. But when conditions are right, the reward is a truly wild experience. Imagine slipping into that current-swept kelp forest, the light dappled and green, as schools of demoiselles and blue mao mao swirl so thickly they almost obscure the big snapper and kingfish hunting through them. We've seen brown dogfish tucked into crevices here, and on one memorable dive, a massive short-tail stingray glided right past us, seemingly unfazed by the commotion. It’s a site for those who enjoy a bit of dynamism, who appreciate the raw power of the ocean and the sheer volume of fish it delivers. If you're looking for something a bit more active than a calm reef cruise, and you’re comfortable with some water movement, Bartle Bay is our pick for a proper Poor Knights rush.
Bartle Bay
Bartle Bay isn't always the easiest dive at the Poor Knights, and that's precisely why we love it. Tucked into the channel between the two main islands, it catches a lot of surge, which means you need to pick your day. But when conditions are right, the reward is a truly wild experience. Imagine slipping into that current-swept kelp forest, the light dappled and green, as schools of demoiselles and blue mao mao swirl so thickly they almost obscure the big snapper and kingfish hunting through them. We've seen brown dogfish tucked into crevices here, and on one memorable dive, a massive short-tail stingray glided right past us, seemingly unfazed by the commotion. It’s a site for those who enjoy a bit of dynamism, who appreciate the raw power of the ocean and the sheer volume of fish it delivers. If you're looking for something a bit more active than a calm reef cruise, and you’re comfortable with some water movement, Bartle Bay is our pick for a proper Poor Knights rush.
Blue MaoMao Arch
Blue Maomao Arch might just be our favourite Poor Knights spot, and that’s saying something. Drop in, and you’re immediately enveloped by thousands of blue maomao, a shimmering curtain that pulses with the light. We love hitting this site in the late afternoon; the sun angles just right, spearing through the water and turning the blue maomao into living stained glass as they swirl through the archway. It’s an easy dive, maxing out around 15 metres, so you can really take your time drifting through the arch. Look for the massive schools of demoiselles too, they add another layer of movement to the already busy scene. Keep an eye out for inquisitive snapper poking their heads from crevices and the occasional kingfish cruising by. It’s not about finding rare critters here, it’s about that sheer, overwhelming volume of life and the play of light. This site is pure magic for photographers and anyone who just wants to lose themselves in a massive fish aggregation.
Blue MaoMao Arch
Blue Maomao Arch might just be our favourite Poor Knights spot, and that’s saying something. Drop in, and you’re immediately enveloped by thousands of blue maomao, a shimmering curtain that pulses with the light. We love hitting this site in the late afternoon; the sun angles just right, spearing through the water and turning the blue maomao into living stained glass as they swirl through the archway. It’s an easy dive, maxing out around 15 metres, so you can really take your time drifting through the arch. Look for the massive schools of demoiselles too, they add another layer of movement to the already busy scene. Keep an eye out for inquisitive snapper poking their heads from crevices and the occasional kingfish cruising by. It’s not about finding rare critters here, it’s about that sheer, overwhelming volume of life and the play of light. This site is pure magic for photographers and anyone who just wants to lose themselves in a massive fish aggregation.
Boarfish Reef Poor Knights
Boarfish Reef is one of those spots at the Poor Knights we always recommend. We love that it manages to feel both exposed and sheltered at the same time, a proper dive even with the 15-meter max depth. Drop down onto the reef and you’re immediately into a mix of kelp fronds swaying in the surge and colourful sponges clinging to the walls. We’ve had some cracking encounters here, particularly with snapper and schools of demoiselles weaving through the kelp. The real magic happens when you pay attention to the walls. We always find ourselves lingering, spotting nimble crimson cleaner fish zipping around and some truly impressive grey massive sponges. Visibility here averages around 7 metres, so it’s not about seeing for miles. Instead, it’s about getting close, exploring the nooks, and appreciating the sheer density of life in a smaller area. It suits divers who appreciate a slow, deliberate dive, those who love poking around rather than just flying past.
Boarfish Reef Poor Knights
Boarfish Reef is one of those spots at the Poor Knights we always recommend. We love that it manages to feel both exposed and sheltered at the same time, a proper dive even with the 15-meter max depth. Drop down onto the reef and you’re immediately into a mix of kelp fronds swaying in the surge and colourful sponges clinging to the walls. We’ve had some cracking encounters here, particularly with snapper and schools of demoiselles weaving through the kelp. The real magic happens when you pay attention to the walls. We always find ourselves lingering, spotting nimble crimson cleaner fish zipping around and some truly impressive grey massive sponges. Visibility here averages around 7 metres, so it’s not about seeing for miles. Instead, it’s about getting close, exploring the nooks, and appreciating the sheer density of life in a smaller area. It suits divers who appreciate a slow, deliberate dive, those who love poking around rather than just flying past.
Show all 97 dive sites in Poor Knights Islands
- Brady’s Corner (Shark Fin Cave)
- Brady’s Corner (Shark Fin Cave)
- Bream Rock
- Bream Rock
- Calypso Bay
- Calypso Bay
- Canyon
- Cave Bay
- Cleanerfish Bay
- Dive Now
- Eastern Arch
- Elephant Point
- Fairchild Reef
- Flat Rock
- Gem Cave
- Goat Island
- Hammerhead
- Hen and chicken island
- Hideaway Bay
- HMNZS Waikato wreck
- Hope Point
- Jan’s Tunnel
- Jones Bay
- Kauri Mountain Awarua Rocks
- Labrid Channel Poor Knights
- Landing Bay Pinnacle
- Landing Bay Poor Knights
- Leigh Reef
- Leigh Wharf
- Lighthouse Bay
- Little Cave Bay
- Magic Wall
- Maomao Arch
- Mary’s Wall
- Mathesons Bay
- Matts Crack
- Mcgregor’s Bay
- Meditation Wall
- Middle Arch
- Ngaio Rock
- Ngatamahine Point
- Noel’s Hole
- Northern Arch
- Nudibranch City
- Nursery Cove & The Labyrinth
- Oculina Point
- Penguin Point
- Poor Knights Island NZ
- Poor Knights Islands - Northern Arch
- Poor Knights Islands - Northern Arch
- Red Baron Caves
- Reotahi Bay
- Riko Riko cave
- Sand Garden
- Serpent Rock
- Shag Rock
- Simpson Rock
- Southern Arch
- SS Wairarapa - Miners Head
- Stanmore Bay Pool
- Sugarloaf Rock Poor Knights
- Tabletop Reef
- Takatu Point
- Taravana Cave
- Taurikura
- Tawharanui
- Te Hua Point
- Te Titoki Point
- The Gardens
- The Gut
- The MUC (Majestic Unicorn Cove)
- The Outpost
- The Plateau
- Tie Dye Arch Poor Knights
- Ti Point Wharf
- Trade Me Reef
- Trevor’s Rocks
- Urquharts Bay
- Waterfall Reef
- Wellington Reef
- Whangarei Heads Old Women
- Whangaumu Bay
- Wild Beast Point
- Wonderview
- Yellow Sponge Garden
Poor Knights Islands Dive Centres
9 dive shops and operators in Poor Knights Islands
Auckland Scuba - Silverdale
DIVE NOW
Dive! Tutukaka
Dive Zone
GOAT ISLAND DIVE and SNORKEL
Moana Futures Ltd
NEW ZEALAND DIVING
Northland Dive
Show all 9 dive centres in Poor Knights Islands
Ocean Wildlife in Poor Knights Islands
79 species recorded in Poor Knights Islands
Poor Knights Islands Daylight & Sunrise/Sunset
Sunrise and sunset times for Poor Knights Islands, calculated from coordinates
Today - Sunday 11 October
Sunrise
05:45
Sunset
18:32
Daylight
12h 48m
Golden Hour
17:58
First light (dawn) at 05:19 · Last light (dusk) at 18:58
Monthly Averages
| Month | Sunrise | Sunset | Daylight |
|---|---|---|---|
| Jan | 05:21 | 19:40 | 14h 19m |
| Feb | 05:54 | 19:18 | 13h 25m |
| Mar | 06:20 | 18:42 | 12h 22m |
| Apr | 06:45 | 17:58 | 11h 13m |
| May | 07:10 | 17:26 | 10h 16m |
| JunShortest | 07:30 | 17:15 | 9h 45m |
| Jul | 07:29 | 17:26 | 9h 56m |
| Aug | 07:04 | 17:49 | 10h 44m |
| Sep | 06:23 | 18:12 | 11h 49m |
| OctNow | 05:39 | 18:36 | 12h 57m |
| Nov | 05:07 | 19:06 | 13h 59m |
| DecLongest | 05:00 | 19:33 | 14h 34m |
Times are approximate local times based on longitude. Actual times may vary slightly depending on the exact timezone observed in Poor Knights Islands.
Where to Stay near Poor Knights Islands
Prices from Booking.com. We may earn a commission at no extra cost to you.
Marine Protected Areas near Poor Knights Islands
54 protected areas near Poor Knights Islands - please respect local regulations when diving
2B2 b
Whangarei Harbour Wildlife Refuge
Poor Knights Islands
Long Bay-Okura
Whanganui A Hei
Te Matuku
Cape Rodney-Okakari Point
Tawharanui
Motu Manawa-Pollen Island
Whangarei Harbour
Mokohinau Islands
Waipu River Mouth Wildlife Refuge
Showing 12 largest of 54
Getting to Poor Knights Islands
Whangarei
Auckland
Kerikeri
Plan & book
Ways to dive Poor Knights Islands, from day trips to liveaboards.
Day trips & courses
via GetYourGuideGuided dives, courses and snorkel trips with instant booking.
Find dive trips in Poor Knights IslandsPlaces to stay
via Booking.comHotels and dive resorts near Poor Knights Islands.
Search stays in Poor Knights IslandsDive insurance
Most travel insurance excludes or limits scuba. Check what you need before you go.
Dive insurance explainedPartner links: we may earn a commission if you book, at no extra cost to you. How we make money